Let's be perfectly clear... I'm not a good painter; I'm distinctly average (maybe above average if I push myself, but I'm far from competition worthy!)
So when you read this Blog title as "How to Paint" remember that it doesn't say "How to paint well"!!
The purpose of this series is for me to document exactly how I've gone about painting up models/ units in my collection so that when I come back to them I don't do something totally different.
It's been over a year since my last installment of this series, but with Covid-19 lockdown in full swing I've gone back to some older projects. Having rooted though old posts hosted on Wargamer Online (our proto-blog, as it were) I've been able to piece together a painting guide for my Age of Sigmar Orruks.
During 2018 the Orruks shot to being my favourite GW army, and I painted a pretty insane number in record time for a doubles event.
Since then I've not really looked at the boys; not even with the new Battletome released in 2019.
With the prospect of a quarantine looming, me knowing my bits box was full of Red Space Marines, I knew I'd need a palette cleanser somewhere. I picked up the Megaboss, and have taken stage by stage painting guides for one of my more... interesting... paint schemes! Da Frost-toof Clan!

Step 1) - Assembly and Undecoating
Build the Warboss... obviously! I tend to build models in complete pieces, but I can understand wanting to do sub-assemblies for ease of painting.
Once assembled, I undercoat with The Fang.
I've just checked the GW Webstore and seen this isn't available anymore... so a base layer of Mechanicus Standard Grey is probably a better alternative, or Grey Seer if you want a lighter finish
Step 2) - Base Colours
With the model assembled and undercoated it's time for the base layers.


The core armour colour is The Fang, with the armour details/ shards painted Temple Guard Blue.
Skin was painted Ionrach Flesh
Cloth, both the trousers/ pants and the tabard/ scraps were painted Balor Brown
The bone on the shoulder guard was painted Rakarth Flesh.
I've opted to paint the Bloodletter skull Black, but you could also paint this Rakarth Flesh too
I also opted to paint the teeth on the necklace Balthasar Gold, but you could easily do these brown too.
The wooden haft of the Axe is painted Gorthor Brown.
Metalwork (axe head and chainmail) was painted Leadbelcher, with leather wrapping painted Doombull brown
Step 3) Shading
A note on shading
I'm kinda lazy/ have a different process with shading.
I tend to favour applying shade over the whole model rather than just in the recesses.
Partly this is just bad habits, but it also let's me apply thin layers of the next colour up at the next stage, allowing me to vary the intensity of the second layer.
It's not best practice I'm sure! So please comment below if you know a better way of doing it!


At this stage the model looks awful... it'll get better!
Four main shades here:
Bone, Wood, Leather wrappings and gold - Shade Agrax Earthshade
Cloth/ tabard - Shade Seraphim Sepia
Metal - our good friends Nuln Oil
Armour and Skin - Slightly diluted Drakenhoff Nighshade. I try to aim for 3:1 or 2:1 Water:Shade, but I'm not super precise
Step 4: Layer back up
Occupational hazard of the "all over Shade" is needing to repeat layer.
Thin your paints and aim for good coverage over most of the mini, leaving some of the softer recesses (such as muscle/ hand recesses, minor armour dents, etc) slightly transparent to the shade below.
Thin your paints and aim for good coverage over most of the mini, leaving some of the softer recesses (such as muscle/ hand recesses, minor armour dents, etc) slightly transparent to the shade below.


As with step 1:
Skin was painted Ionrach Flesh
Cloth was painted Balor Brown
Bone was painted Rakarth Flesh.
Wood was painted Gorthor Brown.
Metalwork was painted Leadbelcher
Leather was painted Doombull brown
Armour was painted The Fang followed by Russ Grey.
Armour detailing/ shards were painted Temple Guard Blue
Gold was painted Balthazar Gold
Step 5: Second Layers and Highlights


Step 5 is an easy one. Layer up the raised portions of the skin Deepkin Flesh
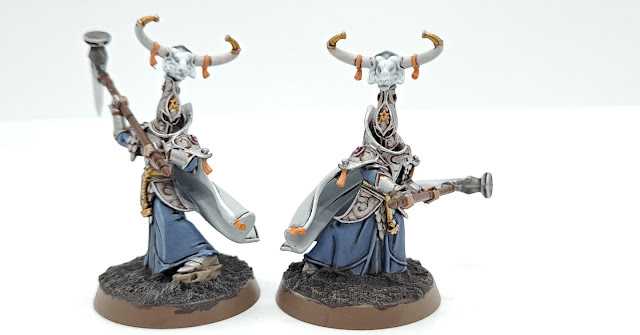
Step 6 - Highlights


The fun bits!
The armour panels were highlighted Fenrisian Grey; paying care to ensure all the edges were covered. Orruk armour has lots of hidden edges because of the rough-beaten look, so keep you eyes out!
The armour details/ shards were highlighted Baharroth blue, paying the same care as the other armour panels.
The bone and skin were highlighted Pallid Wych Flesh.
For the skulls I applied a gentle dry brush before adding a final edge highlight to soften the tone of the Rakarth Flesh base colour, but still provide those sharp edges.
For the Bloodletter Skull I've dry brushed Khorne Red before adding a highlight of Mephiston Red
For the skin I focused the highlights to knuckles, elbow joints and sharp facial features
For the skin I focused the highlights to knuckles, elbow joints and sharp facial features
For the metal I applied Ironbreaker to the edges
The golden teeth I tipped with Auric Gold Armour
The cloth was layered Zamsi Desert before a final highlight of Screaming Skull to the edges
The leather was lightly dry brushed Tuskgor Fur
Step 7: Final Details Paint the tongue Naggaroth Night
Dot the eyes Mephiston Red
Paint the finger nails Rakarth Flesh, and highlight Pallid Wych Flesh!


And with that - model is complete!
Optional! Basing
So far I haven't covered the basing of the model, and you'll have seen that change over the photos too.
So see below for my Basing guide:
Step 1: Assembly
I assemble the model off the base. In this instance I've glued 13mm Cork Sheet only the base for rocks, added some Skulls from the Skulls basing box, and then filled the space with a mix of sand and fine slate.
I assemble the model off the base. In this instance I've glued 13mm Cork Sheet only the base for rocks, added some Skulls from the Skulls basing box, and then filled the space with a mix of sand and fine slate.
Once dry, the Base was undercoated Chaos Black
Step 2: Undercoating
The sand/ slate mix was undercoated Rhinox Hide
Cork rocks were undercoated Mechanicus Standard Grey.
At this stage any obvious pieces of slate visible over the sand were picked out in Mechanicus Standard grey too.
At this stage any obvious pieces of slate visible over the sand were picked out in Mechanicus Standard grey too.
The skulls were painted Rakarth Flesh
Step 3: Shading
Skulls were shaded Agrax Earthshade.
No shading to the grey and brown
No shading to the grey and brown
Steps 4, 5 and 6: Layers and highlights
Dry brush the rock and slate Dawnstone
Dry brush the large rocks Clestra Grey, and dry brush the sand/ slate mix Baneblade Brown
As with the main model, lightly dry brush the skulls Pallid Wych Flesh, followed by an edge highlight around the eye/ nose sockets with the same colour.
Step 7: Details
Flock the base in patches with a 50:50 mix of green and black static grass. This gives the grass a patchy green/brown appearance, making it look more like the tundra I was going for.
Step 8: The last flourish
To really cement the model as being in barren, snowy tundra of Ghur I add a splatter of Valhallan Blizzard to the base, before a splatting of Blood for the Blood God to the Axe head and snow beneath it


***
And with that, you're ready to split skulls in the name of Da Frost-toofs... Frost-teef... Whichever! I've sure the boys will have a good fight over the real answer!
If you see anywhere I can improve my paint scheme please let me know in the comments below, or if this has helped/ inspired you I'd love to know! It'd be great to see the scheme take off, and I've love to see what a better painter could do with it!!
Till next time - so long all!
Visit my Instagram for regular updates on all my hobby activities: https://www.instagram.com/drmedge/?hl=en


No comments:
Post a Comment