As I mentioned in a recent post, I've begun painting a small collection of Necrons in the Tsarakura Dynasty colours. It's been a lot of fun painting the test models up; however, I'm well aware that this is a project that I'll be jumping back and forth on. So I wanted to record my paint scheme for posterities sake, so no future James can curse me once he invariably forgets how to paint a Gauss Flayer properly.
With that in mind, in this post, I'll be detailing every step I took when painting my test models, including every paint and some of the techniques I used. Hopefully, this is of some use to you, the reader, as well.
As an advance warning, this post is a long one. I've tried to title each of the different sections of the model, so if you're looking for a particular colour, you can hopefully skip down to the required area. So then, read on to get a glimpse into the madness that is my painting!
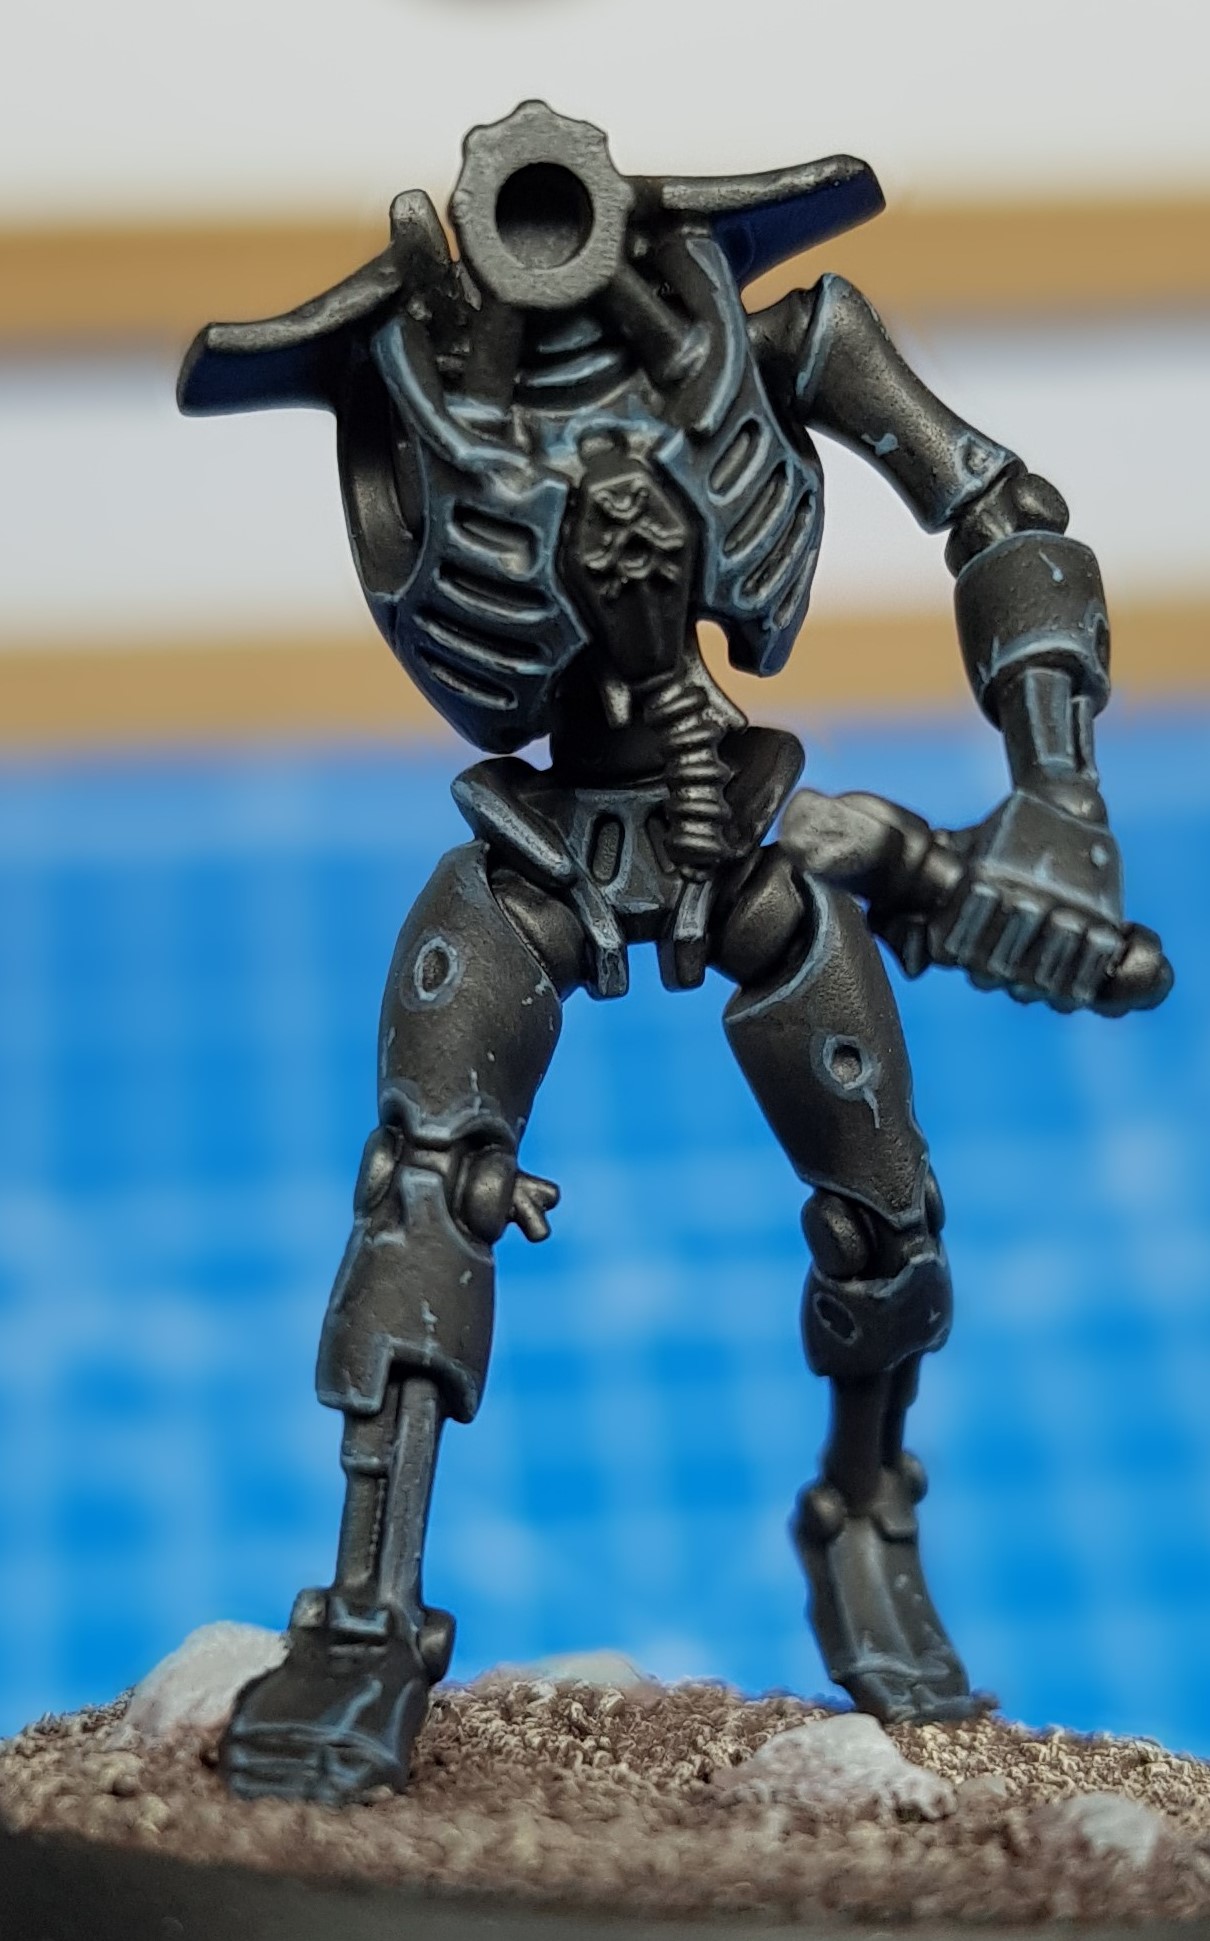
Before going any further, it would be prudent to show you what my test model results look like. There's no point telling you how to do everything if I don't show the end result! So here he is:
 |
| The first of many... |
I'm really pleased with my version. It's by no means perfect; my edge highlighting is still wobbly, the blending on the Gauss effects could be improved, and I'm not entirely sold on the basing I've done, but hey, it's a test model, and as far as I'm concerned it's a resounding success.
Below, you'll find a list of all the paints I used for this model and then a step by step guide for every section. I've listed the colours in the order I used them in, to hopefully make following along a bit easier.
Below, you'll find a list of all the paints I used for this model and then a step by step guide for every section. I've listed the colours in the order I used them in, to hopefully make following along a bit easier.
Paint List
- Chaos Black spray
- Rhinox Hide
- Baneblade Brown
- Ushabti Bone
- Dawnstone
- Administratum Grey
- Abaddon Black
- Eshin Grey
- Incubi Darkness
- Thunderhawk Blue
- Fenrisian Grey
- Blue Horror
- Kabalite Green
- Sybarite Green
- Gauss Blaster Green
- Leadbelcher
- Nuln Oil
- Chainmail
- Runelord Brass
- Reikland Fleshshade
- Canoptek Alloy
- Moot Green
- Flash Gitz Yellow
- White Scar
- Mechanicus Standard Grey
- Ulthuan Grey
- Warpstone Glow
- Caliban Green
- Corvus Black
- Skavenblight Dinge
- Black Templar
- Grey Seer
Right, that's all of them. Hopefully, you've got access to all of those paints and a nice brush with a sharp point (there's a lot of edge highlighting coming up!). Now then, let's get into it!
Up first, clip, clean and spray your model. I elected to keep mine in subassemblies just to make life easier, as it also allowed me to base them in 3 colours to make painting quicker. My model's base is a simple scheme, just using a few slate pieces and some sand.

The Base
Step 1
First up, layer the sand with several thin coats of Rhinox Hide.

Step 2
Then it's a quick drybrush of Baneblade Brown, followed by a lighter drybrush of Ushabti Bone.

Onto the rocks, give them a few thin coats of Dawnstone to start. I then wash the rocks with some thinned Rhinox Hide, focusing on the cracks and lowest points to give it the impression of being worked into the ground.
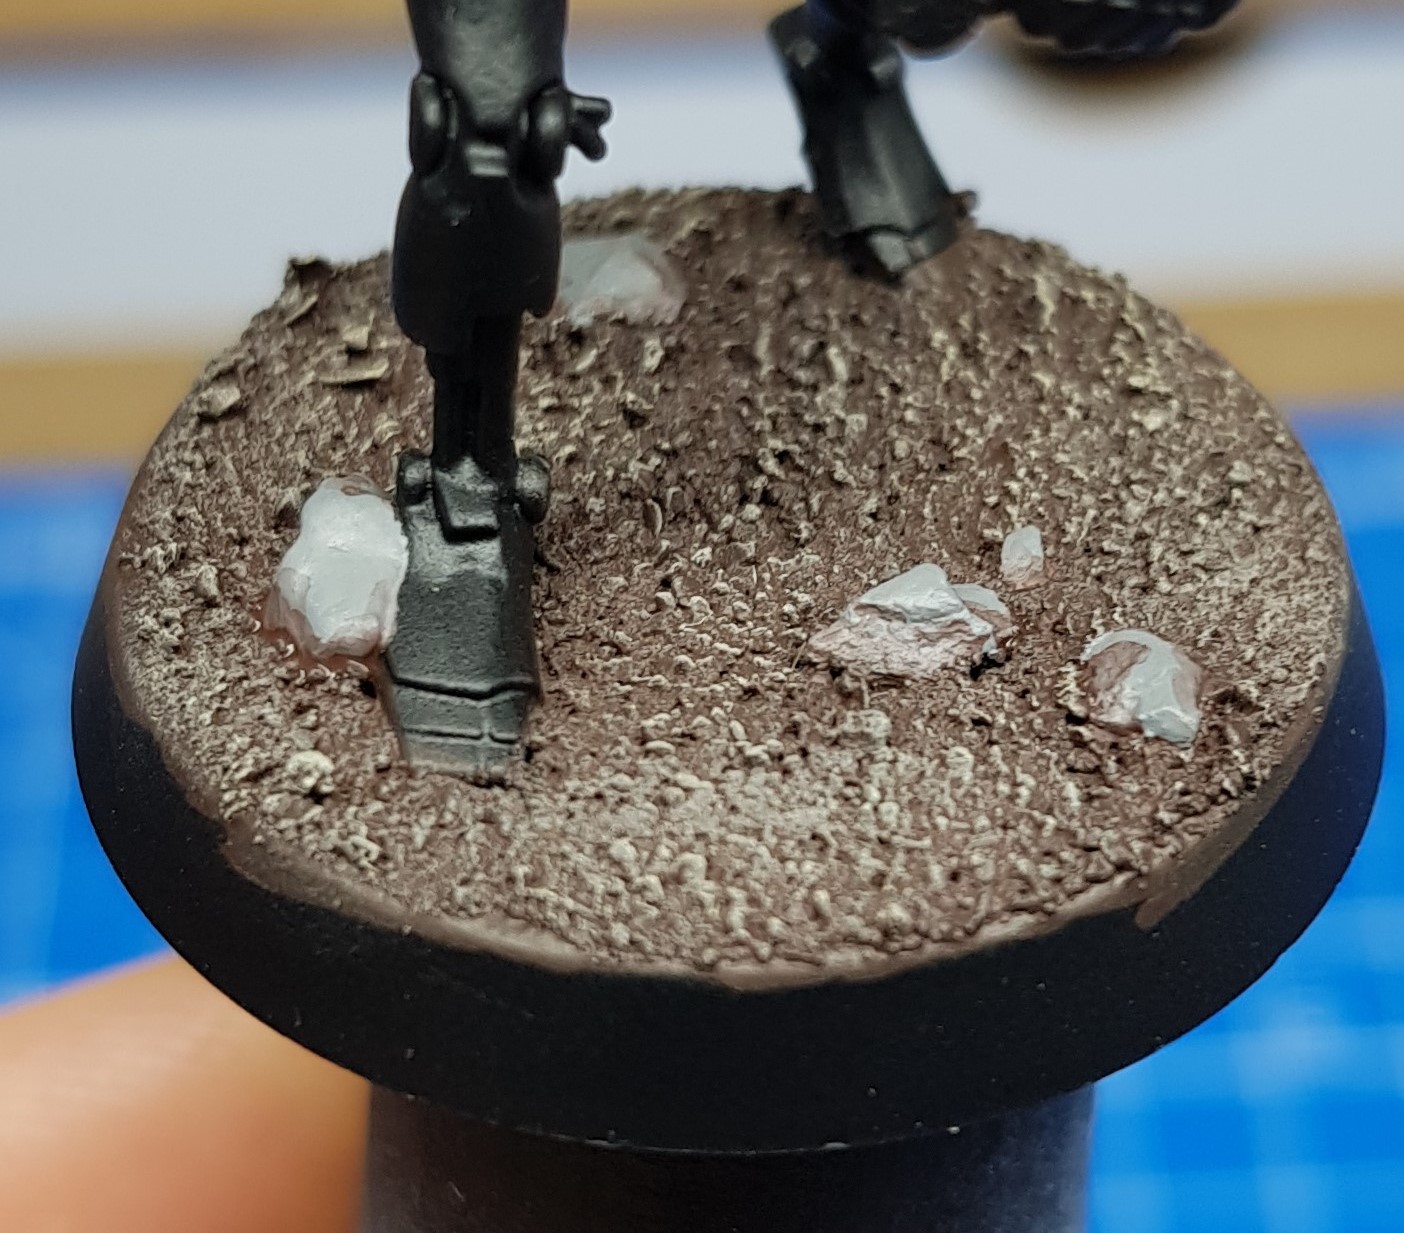
Step 4
To finish up, drybrush the rocks first with Dawnstone, and then a lighter drybrush of Administratum Grey.

Step 5
Add some grass flock for effect. I've actually used too bright a flocking here, and ideally, it would be a much darker green.
Bonus Step
Finally, make sure to paint that base rim! I choose to do mine black, but any colour tied to the base will look good. I feel it helps to bring the whole army together.

The Black Armour
Step 1
Before getting started, I relayer all the black areas with Abaddon Black base paint. This is to clean up any areas after painting the base, and cover the primer spray as it has a different finish to Abaddon Black.
After that, do a chunky edge highlight of Incubi Darkness around all the armour panels. This wants to be a wider highlight, as you'll want it showing once any further highlights are layered on top.

Step 2
Now do an edge highlight of Thunderhawk Blue around all the armour panels. Leave some of the Incubi Darkness showing, as it helps blend the highlights into the black.
At the same time, paint some small scratches using Thunderhawk Blue. Try to place these where the armour would naturally be impacted, like the top points of curves on the leg and arm plates. The important thing to remember with this is that less is more. Don't overdo it, and don't overload your brush. You only need a small amount of paint to achieve the right effect.
Step 3
Highlight the upper areas of the armour panels with Fenrisian Grey. You want to do this on points that would catch the light. At the same time, add more definition to the Thunderhawk Blue scratches by adding small Fenrisian Grey lines over the top.

Step 4
Finally, dot the sharpest edges and top points of the armour with Blue Horror. Also, dot Blue Horror on any points where your scratches intersect with another area, like armour edges or other blemishes.

The Joints
Step1
I chose to paint this model's joints (such as the wrists, elbow and knee joints) in a slightly different black tone to help break the scheme. To start with, I do a highlight of Eshin Grey around every edge.

Step 2
Up next, I do a more refined highlight of Dawnstone, focusing on the upper areas where light would catch.

Step 3
Finally, I do a dot highlight of Administratum Grey on the uppermost points, similarly to the Blue Horror from Step 4 of the black armour.

The Green Armour
Step 1
This is one of my favourite parts of the model, as Kabalite Green is such a lovely colour. To start with, basecoat the back armour plates and the Ankh in the chest's centre in Kabalite Green. Build this up in several thin coats to keep a nice smooth layer on the armour. We don't want any blotches! Annoyingly I forgot to take a picture of this, so you'll have to use your imagination.
Step 2
Now, shade the armour's darkest parts, such as any damaged areas, using a few thinned layers of Incubi Darkness. The trick here is to keep the Incubi Darkness thin and build up the layers one at a time.
Start far out and work the paint into the centre, so you gradually build up a transition from dark to light. As you add layers, progressively shrink the area you're painting, so you leave the farther areas lighter.
Start far out and work the paint into the centre, so you gradually build up a transition from dark to light. As you add layers, progressively shrink the area you're painting, so you leave the farther areas lighter.
I also like to add some additional points of battle damage by dotting small amounts of Incubi Darkness onto the armour. I think this helps add a bit more visual interest to the model.

Step 3
Time for some cleanup! Thin down some Kabalite Green and glaze it over any points you may have messed up. For me, this was principally around the central vanes on the back.

Step 4
Back to highlighting, this time using Sybarite Green. You want to use this to highlight every edge of the green armour. Simultaneously, line the underside of the scratches and battle damage to simulate light catching on them.

Step 5
Last up, it's that dot highlight again. Take some Gauss Blaster Green and highlight only the uppermost edges and points, or anywhere that scratches intersect.

The Metallics
I'll only provide one finished picture of these, as it's nice and simple to do.
For the Silver, which will be things like the pistons in the lower legs, the Ankh of the Triarch and any loose cables:
Step 1
Basecoat all the silver in Leadbelcher.
Step 2
Wash Nuln Oil.
Step 3
Relayer Leadbelcher, then highlight with Stormhost Silver.

For the Brass, which I only use on the larger central cable:
Step 1
Basecoat the brass in Runelord Brass (shockingly).
Step 2
Wash Reikland Fleshshade.
Step 3
Relayer Runelord Brass, then highlight with Canoptek Alloy.

Step 1
Before I get cracking on the gun itself, I like to base the 4 nodes in the gauss coil as this can get a bit messy, so doing it now saves you getting paint on all your hard work. To do this, mix Moot Green, Flash Gitz Yellow and White Scar in a 1:1:1 ratio and layer up those nodes. This is a colour I'll refer to as Gauss Glow in the rest of the article. I'll explain how to paint up the Gauss nodes after the gun casing, but for now, let's get that grey done!
Layer up the gun casing with some Mechanicus Standard Grey as the base spray is a noticeably different colour, so if you need to do any touchups, it won't be noticeable.

Step 2
Wash all of the recesses and any battle damage with a 1:1 mix of Mechanicus Standard Grey and Corvus Black. At this point, I'll also try and generate some natural shading on parts of the model by glazing this mix across it, such as on the underside of the gun.

Step 3
Now, wash only the deepest recesses with pure Corvus Black.

Step 4
Back round to the highlighting, first up its Dawnstone, and this goes on every edge.

Step 5
Next step, highlight all the upper edges with a fine highlight of Administratum Grey to define where your light source is. Make sure to keep consistent with the light source you used on the Warriors body, so it's all being highlighted in the same way.

Step 6
Finally, dot highlight those corners with some Ulthuan Grey.

The Gauss Nodes
Step 1
We're getting there now. As you've already layered on some Gauss Glow, the first step will be to quickly clean this up by relayering and then do an initial wash of thinned Moot Green into the recesses and part-way down each of the nodes.
The idea here is to start at the very lightest point and darken the colour back down with pin washes and glazes.

Step 2
This time, thin some Warpstone Glow and wash this into the recesses, making sure to avoid catching any of the nodes, as we want them to look like they're glowing.

Step 3
For the last wash, thin some Caliban Green and again wash this into the recesses. Try and focus this away from the nodes, so it looks like the light dissipates away from the nodes. In other words, do a better job than what I, unfortunately, did here.

Step 4
To really help establish the glow, paint a thin line of Warpstone Green around the edge of the gun casing, followed by a more selective highlight of Moot Green only around the points close to the nodes.

Step 5
For the last step, clean up any mistakes you may have made on the top points with some Gauss Glow, then mix in an additional amount of Flash Gitz Yellow and layer this into the nodes' centre to give the impression a bright spot.

The Gauss Tubing
Step 1
Start by basing this in Warpstone Glow, then glaze Moot Green toward the tubing's central point. You want this to start off quite broad, as we'll be adding further highlights later. Keep your paints nice and thin to achieve a good transition. Remember, start broad and reduce the area you paint with each layer.

Time to establish some shadows. Glaze Caliban Green into the recesses at either end of the tube. Start away from the shadow and "pull" the paint to the end of the tube, to build up that transition from light to dark.

Step 3
Similarly, using Gauss Glow as you did with Moot Green, glaze this around the centre of the tubing to create a bright spot.

Step 4
Trace a thin line of Moot Green from one side of the tube to the other, to simulate the light catching on the surface. Do this again with Gauss Glow, but over a smaller area.

Step 5
Finally, dot White Scar in the centre of the tubing and line to create a focal point of light.

The Metallics
Step 1
Basecoat all the metal areas with Leadbelcher. This includes the grills in the centre of the gun.

Step 2
Wash the all the silver outside of the grills with thinned Black Templar contrast paint. You want to mix this around 1:1 with Lahmian Medium so that you can glaze a few layers to establish a nice shadow.

Step 3
Glaze on a few coats of Leadbelcher to brighten up any areas you wish, and then highlight the edges with Chainmail.

Step 4
For the weapon grills, thin down some Warpstone Green and wash this into all the recesses, to give the impression of an interior glow. You can also use some Caliban Green to do a pin wash as well.

Step 5
Finally, relayer the tops of the grill with Chainmail.

The Death Mask
The last bits now. Unfortunately, I forgot to take step by step pictures for this, but hopefully, you'll still be able to follow along.
Step 1
Start by basing the Death Mask in a 1:1 mix of Grey Seer and Gauss Blaster Green. This will take a few coats to achieve excellent coverage, so keep your paints thin.
Step 2
Thin some Abaddon Black and layer this into the eye sockets, nose and "mouth".
Step 3
In small increments, add Caliban Green into the previous mix and glaze this into the recesses to create shadows. Be very cautious with the Caliban Green. It's much darker than your mix, so it's better to add a small amount and add more after than go too hard and spoil a whole mix.

Step 4
Clean up any mistakes with some base mix and highlight all the edges with some Ulthuan Grey. After this, dot highlight the most prominent edges with White Scar.
Step 5
The last step! Take some Moot Green and paint the eyes. Simultaneously, thin some Moot Green and run it around the bottom of the eyes and across the nose to establish a glow. Then dot the centre of the eyes with some Gauss Glow and run this across the areas where you want to establish the glow's bright spots.

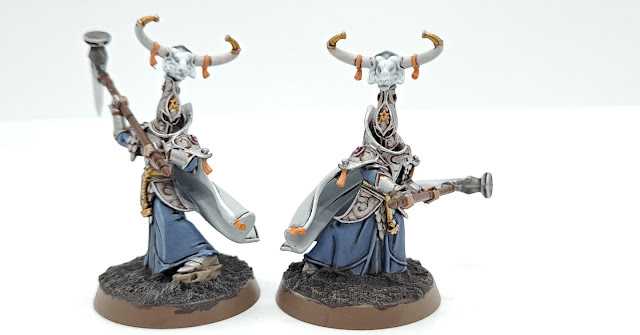
And there you have it, One completed Necron Warrior!
 |
| Or in my case, two! |
I hope this tutorial has been helpful for anyone following along. It's my first real attempt at writing one, so fingers crossed it's done the job. I'm planning on expanding the Necrons throughout this year, so if you're interested in seeing more, keep an eye on the blog for future posts. I've also got an Instagram if you'd like to follow along with my painting madness.
Until next time,
James


No comments:
Post a Comment