Let's be perfectly clear... I'm not a great painter! I'm very much average, and a long way off competition worthy (for that you need fellow blogger James, despite his modesty on the subject!)
So when you read the Blog title as "How to Paint" remember it doesn't saw "how to paint well!!!"
The purpose of this series is for my to document the colours and techniques I've used to paint an army so I can come back to it later. It's also here to offer a little inspiration to the wider community out there - if you like my colour scheme but know you can do better then please feel free to borrow, adapt and tweak these recipes as you like!
Just make sure you share your work with me afterwards!
With that said... let's get into it!
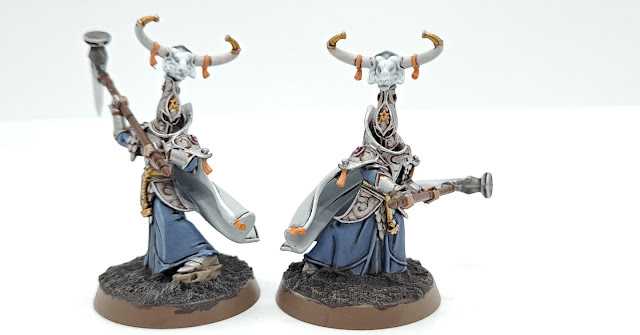
The Bajing Sept are my own custom Sept build for our Xenos on Crusade Tale. As the army has grown I've diversified my colour scheme by adding a Camouflage and Stealth element, but this post will focus only on the ceremonial Blue/ White/ Orange the bulk of my collection is wearing
To get the backstory on this scheme you'll need to read my Intro post to the project, but in short - after painting lots of Imperial units in similar ways I set myself several restrictions on how to paint and what colours to use for the Tau. The end result is a bright and striking force on the battlefield really befitting the Tau style!
For this first post I'll be sharing a step-by-step guide on how I painted Shas'El Myto - my Cadre Fireblade. The model contains most, if not all, of the common elements across the Tau range so represents the perfect demo piece.

Step 1: Assembly & Undercoating
Assembly is the easy part.
I'm always an idiot and fully build models rather than doing sub assemblies... so be less like me if you want to be a good painter!
I used Grey Seer to undercoat the assembled model - a nice off-white to give the final colours a really bright tone.
Step 2: Base Colours
For base colours I start with the armour, painting all the major panels Caledor Sky
Next I painted the cloth sleeves, neck and trousers Celestra Grey, making sure to cover up any mistakes I made with the blue.
I also painted all the Tau icons and elements of the Pulse Rifle Celestra Grey at this stage too
I painted all the areas that would be orange (both the cloak and the armour panels) Squid Orange.
Finally I painted the skin Dark Reaper


Step 3: Shades
With the base colours down I move on to the shading.
The blue armour was shaded using a thinned down Drakenhoff Nightshade
The cloth, Tau symbols and weapons were shaded using thinned down Nuln Oil
The orange robes were shaded using thinned Druchii Violet, the armour panels left un-shaded (not really required, as the recess between the orange and blue was shaded Drakenhoff)
Finally, the skin was shaded using thinned down Nuln Oil


Step 4: Layering
With the shades dry it's time to layer
Starting with white, all elements were layered up with Ulthuan White
The blue armour panels were layered back up with Caledor Sky
The orange elements were layered different depending on the texture.
Orange armour panels and weapon pieces were layered Troll Slayer Orange
The cloth elements were layered Jokaero Orange
The skin was layered using Russ Grey


Step 5: Highlights
With the layers done it was time to highlight
All the blue components were highlighted Teclis Blue
The orange armour was highlighted Fire Dragon Bright
The orange cloth was highlighted with Cadian Fleshtone
The skin was highlighted using Fenrisian Grey
I chose not to highlight any of the white, reasoning pure white highlights may make them too bright


Step 6: Details
With the majority of the model done I moved on to the final details; hair, braid buckles and jewels.
The hair was painted Abaddon Black. I chose to leave it there, not wanting to draw too much attention to it.
The braid of rope holding the cloak up and the hair rings were painted the same way - Base coat Balor Brown, shade with Reikland Fleshshade, layer with Zamesi Desert, highlight with Ungor Flesh
The jewels in the rings were painted Mephiston red with a dot highlight of Evil Suns Scarlett, as were the lenses on the Markerlight

All my Tau are based the same way more of less, and you can see elements of the basing as the model progresses in the photos above.
I start by applying a base layer of Rhinox Hide to the base.
I apply Agrellen Badland over the top and allow it to crack and dry
I then drybrush the base Karnak Stone before applying the final pieces of tuft. These used to be some of the Mordheim Tufts from GW, but they discontinued the desert/ scrub shade of tuft.
I've since switched to the Army Painter Highland Tufts which work as great substitutes (I source mine from Wayland, hence the link... no affiliation! Get yours wherever you like!)
With those steps complete... the model is complete!!
Subsequent posts will focus on the extra steps I take for Battlesuits, and the Stealth and Camouflage elements of the army, but for now this post will serve as my own little painting guide, and help out any beginners (or veterans) that like my scheme and want to replicate it.
I hope you do a better job than me!!
Thanks all for reading, and be sure to share with me your great painting schemes and any tips/ advice you have for future content
Until next time - stay safe and happy hobby!


No comments:
Post a Comment