So when you read this Blog title as "How to Paint" remember that it doesn't say "How to paint well"!!
The purpose of this series is for me to document exactly how I've gone about painting up models/ units in my collection so that when I come back to them I don't do something totally different.
The purpose of this series is for me to document exactly how I've gone about painting up models/ units in my collection so that when I come back to them I don't do something totally different.
If you like the colours/ style that I've gone for then by all means follow this guide, even improve upon it, but make sure you let me know in the comments below. I quite like to pick different/ interesting paint schemes for my armies and I'd be very pleased to know I'd inspired even one person!
As I've said above there's scope to adjust/ change the way I paint... and I may even change the order as I get more used to/ familiar with the project. Where steps change I'll make changes to the post below, so if you chose to follow my scheme then check back often for potential changes!
Before I get into the full description two quick points.
1) Always remember the immortal words of Duncan Rhodes and use #TwoThinCoats when painting to ensure the best coverage.
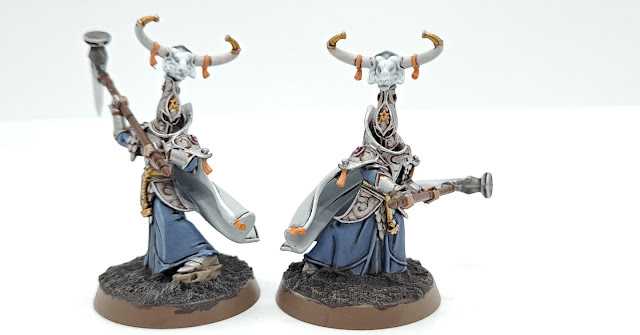
2) The paint scheme I'm using is a purple/ white counterchange pattern, so I'll often refer to the "left" or "right" of a miniature for different colours. To properly orientate yourself to this always face the miniature away from you so that it's left/ right are the same as your left/ right.
With that intro said and done let's get to it!
Infantry
Step 1:
Assemble your model, and undercoat using the Leadbelcher Spray.
In this example I've already attached the model to the base, but it may help to leave it off the base for painting the legs/ inside the cloak in later steps
In this example I've already attached the model to the base, but it may help to leave it off the base for painting the legs/ inside the cloak in later steps

Step 2:
Paint the right half of the outer section of the cloak Naggaroth Night. This includes the right portion of the cloak tail, the sleeve and the right half of the hood.

Step 3:
Paint the left half of the outer section of the cloak Celestra Grey (again, including the sleeve and hood). Don't worry about being too neat where the colours meet in the centre of the cloak - you can tidy this up later.

Step 3b:
If needed, tidy up any metallic sections with Leadbelcher before the next step.
You can also tidy up the line where the purple and grey meet at this stage too.
You can also tidy up the line where the purple and grey meet at this stage too.
Step 4:
Paint the cloth parts of the models legs Abaddon Black.

Wash the whole model with Nuln Oil.

Step 6:
Paint the left half of the outer cloak Ulthuan Grey, leaving the recesses dark after the wash.

Step 7:
Paint the right half of the outer cloak Xereus Purple, leaving the recesses dark after the wash.

Step 8:
Paint bronze details Balthasar Gold.
Details which must be painted gold: Cog Mechanicus in the centre of the chest, the upper shoulder pads, Rebreather, the sensor nodes/ censers at the end of the data cables.
Optional gold elements: Outer ring of eyes, backpack details.

At this step models with different weapon options will need different elements.
Plasma Caliver, Radium Carbines and Arc rifles should be painted as above - The main weapon frame should be painted Balthasar Gold, leaving the magazine and/ or power coils silver.
Transuranic Arquebus/ Galvanic Rifles should have weapon filigree painted gold, leaving the main weapon frame and magazine silver.

For melee weapons, such as the Omnissian Axe, paint the blade and pommel Balthasar Gold

Step 8b
For Transuranic Arquebus/ Galvanic Rifles paint the main weapon frame Gorthor Brown, leaving the magazine and the firing bolt silver.

For Omnissian Axe handles, paint the strapping Mephiston Red

Step 9
Wash all the Balthasar Gold with Agrax Earthshade

Step 9b
If required, wash the Mephiston Red handle strapping/ Gorthor Brown weapon frames Agrax Earthshade


Step 10:
Paint the inner lining of the right half of the cloak (the purple half) Slaanesh Grey

Step 11:
Paint the inner lining of the left half of the cloak (the white half) Celestra Grey

Step 12:
Paint any exposed weapon power coils Caledor Sky

Step 13:
Paint the raised edges of the power coils Temple Guard Blue

Step 14:
Drybrish the power coils White Scar

Step 15:
Paint the ribbon on the Purity Seals Ushabti Bone

Step 16:
Shade the ribbon on the Purity Seals Seraphim Sepia

Step 16:
Add an additional layer of Ushabti Bone, leaving recesses and a line between the two pieces of parchment shaded.

Step 17: (No photos for this bit... not really needed!)
Paint the wax seal Mepheiston Red
Wash the wax seal Aggrax Earthshade
Highlight the edges of the wax seal Evil Sunz Scarlet
Step 18: Detailing
Use a combination of Caledor Sky (Blue), Averland Sunset (Yellow), Warpstone Glow (Green), Mephiston Red (Red), Abaddon Black (Black) and Troll Slayer Orange (Orange) to paint the various lights, lenses and cables on the backpack and face of the Infantry


Step 19: Basing
Unfortunately I started basing these miniatures waaaay back when Games Workshop still provided a white texture paint. To keep the basing consistent I've had to develop a workaround!
Start by basing the miniature using any colour texture paint (in this example I've used Astrogranite)

Step 20: Basing
Paint the texture paint Ulthuan Grey. Multiple layers may be required based on the Colour of the underlying texture paint, then apply a heavy glaze of Guillaman Blue

Step 21: Basing
Drybrush the base Ulthuan Grey, and paint the rim of the base Abaddon Black

Step 22: Basing
Finish the base by adding a final drybrush of White Scar and small patches of Valhallan Blizzard

Step 23: Final Details
Paint a counterchange cog-tooth motif on the cloak.
Use Ulthuan grey to paint the cogs on the purple, and Xereus Purple to paint the cogs on the White


And that's it done!
For the generic infantry I'm not going too hard on Highlighting. It's a slippery slope and I want to get a good tabletop army ready then I can come back to as required
Taking it to the next level:
I'm adding this section to remind myself, and anyone that want's to follow along, what I use to take the mini to the next level with highlighting.
I typically only use this for characters and bigger models (like tanks) because of the extra hassle/ time required.
For Purple areas highlight with Daemonette Hide
For White Areas highlight with White Scar
All metal areas Highlight with Stormhost Silver except for Character Axes, which are highlighted Retributor Armour with a final edge of Stormhost Silver


That's a great step by step, unfortunately mine already have a Mars red design, but I love the counterchange cog motif, I will steal that for an upcoming squad of Skitarii.
ReplyDelete