Hi all, its Neil here and welcome back to my WW3 Team Yankee series. Today I'm going to continue my look at the British forces in Team Yankee by looking at the Support units. If you want to take a look at the formations that the British get, check out Part 1.
By Support, I mean both the units in the force diagram labelled as Divisional Support Options and units in the the formations that weren't the main focus. These can be divided in 4 categories; anti-tank guided missile launchers, artillery, anti aircraft and aircraft.

The British have access to 4 different Anti-Tank Guided Missile Launchers, all of which are part of the various formations rather than Divisional Support options.

The first is the Swingfire Guided Weapons Troops which can be taken in the Challenger and Chieftain formations. The Swingfire mounts a anti-tank 23 missile is guided (which negates the penalty to shooting at long range) and HEAT (which negates the bonus to the target's armour rolls at long range). This allows it to easily destroy any vehicle except the newest tanks from the front but as it's weapon is compatible to the guns mounted on the tanks in the same formation with much less armour. This makes them seem a bit superfluous though they are able to sit in cover and remain gone to ground even when shooting, changing their to hit on a 4+ to a 6+.

The next option is the Striker Guided Weapons troop in the Medium Reece formation, which has is functionally the same as the Swingfire. Compared the to Swingfire though it has more potential use as the formation it is part of doesn't have any other units with similar firepower.

The third option is the Spartan MCT mobile milan unit, which come as an option in the Warrior and FV432 Infantry formations. The Spartan MCT mounts the milan missile with its anti-tank 21 making it less powerful than the Swingfire and Striker but it is a much cheaper option because of this. This seems to suffer the same as the Swingfire as the formation has multiple options for milan missiles elsewhere but it does allow you to bring a few more milans to fight the Russian tanks if you need them.
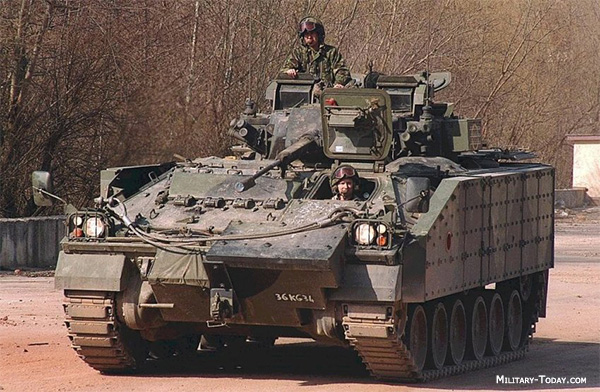
The last option for the ATGM launcher is the Warrior Anti-Tank, which can be taken instead of the Swingfire in the Challenger formation or instead of the infantry Milan unit in the Warrior Infantry formation. This is the uparmoured version of the Warrior Transport that instead of having transport capacity it instead mounted a dedicated milan missile launcher. This is a cheaper option than the Swingfire with its less powerful missile but it also mounts the anti-tank 10 autocannon giving it a secondary role in taking on massed light armour better than the other ATGM launchers.

My pick of these is the Striker as it brings something that the rest of the formation can't while the rest seem to overlap with the main part of their formations. I do also like the Warrior Anti-Tank option as it is more flexible if its preferred target isn't around.
For artillery there are 4 options again, with two being in formation choices and two as support choices. All these artillery options do have a skill of 3+ that allows them to be more reliable when ranging their bombardment.

The Abbot Field Battery is the most common option in formations being available in both tank and both the FV432 and Warrior infantry formations. The Abbot is a good artillery piece with the ability to barrage with anti-tank 4 against the top armour of targets (who have a maximum of 2) as well as being able to fire smoke too. It can also if needed fire directly with a good anti-tank of 17 with HEAT if the enemy gets too close.

The other in formation option is the FV432 Mortar Platoon available in the FV432 and Warrior infantry formation alongside the Abbots. It only has an anti-tank of 1 meaning that it can't threaten armoured units but can still help to against infantry to soften them up for an assault with your infantry or to use smoke to screen your troops. It is a very cheap option so it can be used to get another unit in the formation for morale reasons as well as its role for supporting infantry against dismounted infantry.

The first of the support choices is the M109 Field Battery, which is fairly comparable to the Abbot though with slightly more armour and a better firepower rating for its artillery bombardment though the Abbot has a better direct fire profile. It is more expensive in points than the Abbot so will have less brought to the battlefield but is more useful for actually destroying armored targets and dug-in infantry.

The last option is the MLRS Medium Rocket Battery, which is new for this book. It uses a salvo template when firing meaning it can hit a much larger area with its anti-tank 3 bombardment, though its lower firepower means that it will destroy less hard targets. It also has the MLRS special rule which means each vehicle counts as two for bombardments keeping them effective for their lower unit sizes. The MRLS can take minelets as well allowing it to create a once-per-game minefield on the table which helps with channeling your enemy into better fire-lanes for your other forces. It is the most expensive per vehicle of the artillery options.

My pick of the artillery choices is the Abbot as it appears to be the most cost effective way of bringing artillery to the table even if it does trade off in a bit of firepower for the lower cost and it has another advantage of being within formations allowing them to stick around for longer.
A quick mention while we're on artillery is the FV432 FOO. Its a support choice that can be taken if you include at least one artillery unit with the Observer rule. This allows it to add 1 when ranging in artillery as the spotter so boosting that 3+ to a 2+ to further improve reliability of your artillery on the table.
For protecting your airspace from enemy aircraft there are three options the British can field. These are all support options with no anti-aircraft available in any formation. When picking your force they can all be taken in a single list as well if you wanted.

The first choice we're going to look at is the Tracked Rapier SAM Section, which is most specialized of the AA choices. Each Rapier is armed with a Rapier missile launcher with RoF 3, an excellent firepower and long range meaning they can cover a large area and have good chance at destroying aircraft they hit.

The second is another missile based AA choice, the Spartan Blowpipe SAM section. These are Spartans with the Blowpipe AA missile which has a RoF 2 and average firepower but unlike the Rapier it can also engage ground targets with a RoF 1 anti-tank 12 HEAT missile. This means that it can pull double duty as a light vehicle destroyer too but it is not as good at either job as the dedicated options.

The last option is new for the updated book, the Chieftain Marksman AA Battery. This is the only non missile option for AA with its twin guns that have RoF 5 anti-tank 11 with average firepower. This is couples with the Radar rule which increases the range of these weapons when firing at aircraft. With the hull being that of the Chieftain tank, it brings a front armour of 6 allowing it to be resilient against things like autocannons but still not enough to be a front line unit. The Marksmen looks like the best option of these with its high RoF, ability to take on lighter vehicles like enemy IFVs and some protection though I would probably also take the Rapiers alongside as aircraft can provide quite a threat from what I've seen so far.
The last category to look at is aircraft, both fixed wing strike aircraft and helicopters. The British have one option for each.

The TOW Lynx Helarm Flight is the British attack helicopter, sharing the same air frame as the transport used by the airmobile infantry. On this it packs the Improved TOW missile with a RoF 1 and anti-tank 21 with the Guided and HEAT special rules. This profile coupled with its unlimited movement makes it great for getting around the flanks of tanks to get at their lower armoured parts but it does lack the ability to fire on the move so needs some planning to get it in the right place quick. To help it survive till it can strike it has the Hunter-Killer rule, which allows them to be concealed by terrain unlike aircraft normal would meaning they can improve their to hit from 4+ to 5+ as well as allowing them to move and remain Gone to Ground until they shoot. This means that while they position if placed careful the enemy will need a 6+ to hit them. The TOW Lynx looks like a reasonable option as it combines high mobility with good firepower but it quite expensive points-wise.

The Harrier Close Air Support Flight is the strike aircraft unit for the Brits, and a super iconic plane in real life! The Harrier as a strike aircraft acts a bit differently to other units, each turn they require a roll to see if they are available for the player to use then are removed at the end of the player's turn. Normally this is a 4+, so you normally expect them to turn up only for half of the game but the Harrier has the Jump Jet rule which turns this into a 3+. This rule represents their ability to take off vertically allowing them to be stationed closer to the front than planes needing runways. Weapon-wise it comes armed with a 30 mm Aden gun with RoF 3 and anti-tank 3 for shooting down other aircraft as well as the BL-755 cluster bombs. The cluster bombs are a Salvo weapon with anti-tank 8 which means that if a vehicle is hit, there's no way to save those hits. The Harrier is a powerful aircraft and its improved reliability as a strike aircraft makes it a good choice for lists to threaten even the heaviest tanks. It does have a couple of weaknesses though as even with a 3+ its unlikely to be available all game (and you know its not going to turn up when you need it most because sod's law) and as they leave the table at the end of the turn they lose their ranged in marker with the cluster bombs but the 3+ skill helps mitigate this.

There is one more support option to talk about, which is the Formation Support. This allows you to add compulsory units (black box units) from formations as a support unit. This lets you do things like bring a unit of tanks alongside a formation that couldn't take any for example such as taking a Challenger unit to support a Medium Recce Squadron. This option has some restrictions, firstly each black box unit may only be taken once as a support option and secondarily you may not take a formation support for a unit you already have in any formation in the list. My top unit ideas for this are the Challenger (due to their cost when taken as a formation) and the Airmobile Infantry (a mobile unit with good missiles that can exploit gaps without committing to the full formation).
Support options are useful for covering weaknesses that your formations can't do but as they don't count for keeping your force in good spirits, you need to be careful in balancing the support choices (which are often more powerful) with the number of units in formations.

I hope this was helpful for those who are currently looking at Team Yankee. I know that I'm looking at it through a new player's eyes but hopefully it still gives somewhere to start looking if you're also starting a British force (or gathering some intel for the Russians).
This rounds out the look at the British in Team Yankee with Part 1 for my look at the various options for players to build a list.
If you enjoyed this content come back soon for a look at the new US forces book for V2.
See you around for more Team Yankee content and if you want to check out what I’m painting head over to Instagram. If you have any suggestions about what you'd like to see for Team Yankee content let me know in the comments.


No comments:
Post a Comment